Sardine Can Blanket
The Final
The Concept
It all began with wanting to commission me to make some sort of fish
craft...
From there, I remember being bored in a meeting while thinking up how such a
blanket could be made. I originally was going to find a comically large
zipper to serve as the pull tab and have the unzip revealing the fish. But
looking at more references, I though about rolling up the top layer. The
bonus would be that it would also serve as a pillow!
Early Design
After loving the roll up can idea, I started moving forward with the look. A
lot of the inner can design was to figure out how many sardines there should
be, or if they should have fins, which direction they should be facing.
I'm not much of a graphic designer but I did design this teal cover design.
I didn't really like it so I asked a friend to help out. He came back the
primary color design and we went from there. I did tweak a few things from
his design. It was to make the sardine he drew match more of the sardines
that would be in the can layer.
Test Mini Blanket
[Pictures To be added]
Since this concept was kind of out there, I make a mock up at 40% the final
scale. I made it out of Muslin cotton fabric. The goal was not to make
something perfected but to figure out the placement of buttons and straps to
tie back the rolled up lid. I also tried to make a pull tab.
Ultimately, I omitted the ties on the inside because I didn't think they
were necessary. I omitted the pull tab because it would take away from the
lid's design and make the lid bumpy when you rolled it up.
Tester Fish
The Tester Fish was important because we were shopping for what the right
fabric should be. Silky? Shiny? Matte? I forget what scale this fish was but
I know it was slightly smaller than the final ones.
The Toggles
This gets it's own section because I had the idea of adding Fish
buttons/toggles very early on. It was one of aspect of the blanket that I
wanted to be a surprise in the end. I started by searching for just fish
buttons but there weren't that many options and none that matched my vision.
So why not make my own? I tried make some from Sculpy clay. I bought a
sardine shaped clay cookie cutter and everything! The first problem was that
these were really small! Too small to actually be practical on the blanket.
The other problem was the clay wasn't that strong after baking. Back to the
drawing board.
Etsy is one of my best friends. I searched for wooden fish. Turns out that
people small wooden fish to make a school of fish design on there wall.
Meaning that you can packs of these fish in various sizes fairly easily. The
problem with those are that I would have to drill 2 holes in each of them.
Sigh... extra work!
There was one seller on Etsy that found that does laser cutting. They
happened to already have a fish pattern that they offer. So I messaged them
and asked them to add holes. They agreed! Yay! And one month later all the
way from Poland, the toggles were acquired.
The plain birth would look nice as is but knowing that this blanket would go
places and be used outdoors, I would at least have to seal it with
polyurethane. I also slipped in staining the wood a blue color to match the
blanket's design in-between sealing it with the polyurethane.
The Beginnings
The method I went for sewing is called Applique. I used this method on the
Naruto blanket and learned a lot from that project. How I start is by
printing to scale the Sardines that were designed in Photoshop. I cut the
outlines and taped the paper together to create the guide.
The Top/Can Lid
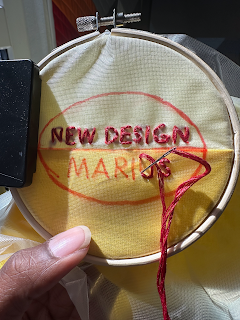
Hand Embroidery
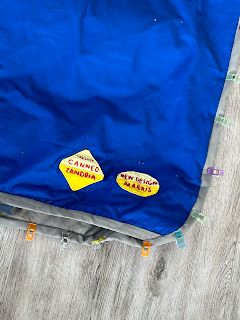
Had to add the artist's signature somewhere. Why not design so it fits with
the theme?
The Bottom/In the Can
This part was fairly straight forward. Using applique, I built each sardine
induvially before tacking them down to the base layer. The concept was there
but in execution, the fishies wouldn't lay flat. To hide/solve this problem,
I adding PolyFil. Polyfil is the stuffing you'd find in stuffed animals. It
actually worked out better than expected by making the blanket feel just a
little bit more soft and adding an extra layer comfort.
The Sardine Can Bag
The design of this bag actually came to me very late in the project. I knew
I wanted to make a bag (It was another surprise), but I didn't know what it
would look like. I like use the fabric scraps anyway possible when I make a
project. This was no different. For the longest time, I thought that I would
just make a "scrap quilted bag." It would have had a mosaic look but feature
all the fabric in a patchy style. It was a lot more work and I wasn't
totally looking forward to it after this long process making the blanket.
About a week before I finishing the blanket, I remembered that I not only
bought the extra wide (108in across) fabric but I also bought the salvage! I
had more than enough fabric to just do a gray bag. But I needed to be extra
and on theme so the Sardine bag was created!
My sewing machine can also do machine embroidery. The max hoop size is a 4in
x 4in. It's not that big so I experimented with spacing out the letters. I
started by doing two letters at a time starting with 'S' and 'A', then 'R,'
rehoop the fabric, and 'D.' The problem is I could not space out the two
letters in the pattern. Meaning that stitching out the 'SA' and 'RD'
have different spacings. Also meaning that if I want even spacing, I would
have to stitch each letter individually. Another tedious process that could
easily get misaligned. So I took the safest, easier route and made the text
the max size my machine could do.
Put It all together!
Nothing to it but to sew it.
Wouldn't be a big sewing project if I didn't break my needle along the way.
After sandwiching the base layer together, I was afraid the layers would
slip over each other. The solution for most mass produced blankets is to add
dots evenly spaced through out the blanket. Me being extra, I thought "Why
not machine embroider fish?" I found an ok free fish design online and did a
test stitch. After feeling confident that adding this was a good idea, I
turn to the blanket and... the hoop couldn't fit. The fabric was too thick!
My machine can also do decorative stitches. The new vision was to pick the
closest that was fish-ish shaped. Didn't really have that. I ended up
choosing circular design because they look like bubbles.


